


アプリの設定をする
- ※1 OSやアプリのバージョンにより、仕様や操作方法、画面イメージが異なる場合があります。
Y!mobile メールアプリ設定について
Y!mobile メールアプリは、Y!mobile メールアドレス(@yahoo.ne.jp)をはじめ、MMS/SMS/+メッセージ(※1)、Yahoo!メール、Gmailなど(※2)複数のメールアカウントをまとめて管理できます。
| アドレス | 特長 | |
 |
△△△@yahoo.ne.jp | Y!mobileで提供しているメールサービスです。自宅のパソコンからでも、スマホと同じように送受信することができます。メールアドレスの@以降は「yahoo.ne.jp」です。 |
 |
△△△@yahoo.co.jp | Yahoo! JAPANが提供するウェブメールサービスです。Webからもスマホからもご利用いただけます。 |
 |
△△△@gmail.com | GmailはGoogleのウェブメールサービスです。Web上のGmailと、本機のGmailを自動で同期することができます。メールアドレスの@以降は「gmail.com」です。 |
 |
△△△@ymobile.ne.jp | 従来と同じケータイのメールアドレスを使い、ケータイやパソコンとやりとりできます。メールアドレスの@以降は「ymobile.ne.jp」です。 |
 |
携帯電話番号 | 電話番号宛に送受信可能なメールです。お申し込み不要で、すぐに利用できます。送信文字数に応じて1回あたり3.3~33円利用料金が発生します。(ご利用の機種より1回に送信可能な文字数が異なります。) |
- ※1 Y!mobileまたはSoftBankで契約している場合でも、一部ご利用になれない契約プランもあります。
「+メッセージ」は一部端末ではご利用いただけません。 - ※2 ドコモメールに対応しています。
他のアプリでメール設定する場合は、
各アプリの仕様をご確認の上でご設定ください。
1
Y!mobile メールアプリを起動
ワイモバイルでスマートフォンを購入した方はアプリ一覧から「Y!mobile メール」をタップしてください。
![]()
ワイモバイルでスマートフォンを購入した方は下記を押下してお進みください。
お持ちのスマートフォンをご利用の方、もしくは、アプリがうまく起動しない場合は、下記を押下してアプリのインストールをお願いします。
![]()
お持ちのスマートフォンをご利用の方、もしくは、アプリがうまく起動しない場合は、以下のQRコードを読み込みアプリのインストールをお願いします。

![]()
※ログイン画面が表示される場合
初期登録で取得したメールアドレス(@yahoo.ne.jp)とパスワードでログインします。
2

この画面が表示されたら、内容を確認し「OK」をタップ、アプリの権限を確認し「許可」をタップ
3

ご希望の表示方法をタップ
リスト型と会話型表示について
リスト型
通常のメール形式でメルマガなどの閲覧に最適です。

会話型
チャット形式でコミュニケーションに最適です。

4

アプリで利用する色をタップし、「Y!mobileメールをはじめる」をタップ
5

Wi-Fi接続設定の有無を選択
6

受信箱が表示されます。
アカウントを切り替える
タブ切替の場合

メールの一覧上部にあるアイコンをタップすることでアカウントを切り替えることができます。
 ポイント!
ポイント!

左上のアイコンに数字が表示されている場合は、個人フォルダなどの別のフォルダに未読があります。
サイドメニューをタップすることで確認することができます。
サイドメニュー切替の場合
1

サイドメニューからもアカウントを切り替えることができます。
サイドメニューは、左上のアイコンから移動できます。
2

サイドメニューの一番上に表示されているのが、現在選択しているアカウントです。このアカウントをタップします。
3

現在選択しているアカウントをタップすると、登録しているアカウントの一覧に切り替わります。
変更したいアカウントを選択しタップしてください。
表示方法の変更
1

サイドメニューから「設定」を選択します。
2

「表示方法」をタップします。(項目には現在設定されている表示方法が表示されます。)
3

ダイアログが開き、表示方法を選択して「決定」をタップします。
メールを送信する
リスト型
1

一覧画面の右下にある「新規作成ボタン」をタップします。
2

宛先と内容を入力後、右上の送信アイコンをタップして送信することができます。
宛先をタップすると送信したい相手やグループを選択することができます。連絡先にチェックを入れて、右下の「決定」をタップします。
3

メール作成中に←をタップすると前のページに戻ることができますが、その際にメールを「下書き」フォルダに保存することができます。下書きとして保存したい場合はダイアログで「保存」を選択してください。
会話型
1

一覧画面の右下にある「新規作成ボタン」をタップします。
2

送信したい相手やグループを選択し、右下の「決定」をタップします。
複数の人に送信したい場合は、複数の連絡先にチェックを入れます。
3

下部にあるフォームをタップすると本文を入力することができます。入力が完了したらフォーム右下の送信ボタンから送信することができます。

メールを受信する
リスト型
1
一覧からサブメニューを開きます
2
「メール問い合わせ」のタップでメールの受信が開始されます。
かんたん!

一覧ページで画面を上から下に引っ張ることでもメールの受信が開始されます。
会話型
1
一覧からサブメニューを開きます
2
「メール問い合わせ」のタップでメールの受信が開始されます。
かんたん!

部屋の詳細ページで画面を下から上に引っ張ることで受信が開始されます。
※電波状況により取得に失敗する場合があります、
電波環境の良い場所でおこなってください。

+メッセージを利用する

+メッセージは、SMSと同じように電話番号だけでやりとりができるメッセージサービスです。
+メッセージの利用者間では、スタンプ機能、画像・ファイルの送信、グループ機能などがご利用いただけます。
また、メールがちゃんと送信されたことや、相手の既読状況が確認できるようになるため、大切なメールが届いたことがわかるようになり安心です。
+メッセージを利用開始する
1

メール一覧上部にあるアイコンをタップしてSMSタブを開きます。
2

表示された画面で[はじめる]ボタンをタップすると利用開始できます。
3

+メッセージの利用を開始すると[SMS]アイコンが[+メッセージ]アイコンに切り替わります。過去に受信したSMSや今後受信するSMSも+メッセージタブよりご確認いただけます。
ポイント!

この画面が表示されない場合は、設定画面の上部に表示されている青色のお知らせをタップしてください。
個人フォルダーと自動振り分け
(フィルター機能)
リスト型のみの機能となります。

サイドメニューから「設定」を選択し、その中の「フィルター」をタップします。
すでに作成しているフィルター名をタップすると編集することができます。

「フィルターの名前]「移動先フォルダ」を設定し。
フィルターの内容を入力します。右上の決定をタップでフィルターが設定されます。

フィルターの設定はメール一覧のサブメニューからも行うことができます。
迷惑メール対策を設定する
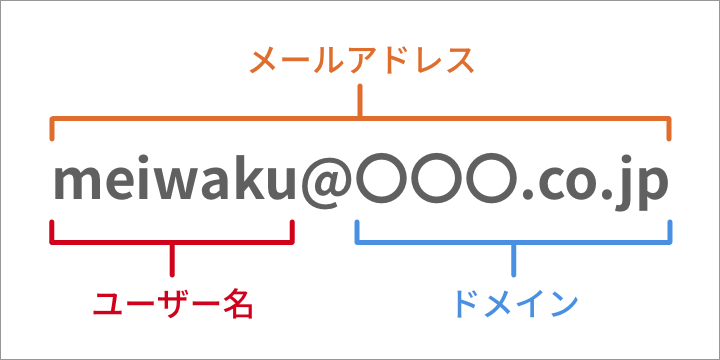
迷惑メール条件をメールアドレス・ユーザー名(@の左側)・ドメイン(@の右側)・件名から選択して登録できます。
登録された条件に一致するメールは、迷惑メールフォルダーに振り分けられます。
リスト型
1

メール一覧で「(チェックボックス)」をタップして迷惑メール登録したいメールを選択します。
2

「迷惑メール登録」アイコンをタップします。
3

登録したい迷惑メール条件を選択し、「登録」をタップすると迷惑メール条件が登録されます。選択したメールは迷惑メールフォルダーに移動します。
件名を選択した場合のみ編集画面が表示されます。特に変更の必要がない場合はそのまま「登録」をタップで登録できます。
会話型
1

メール一覧でチェックボックスをタップして迷惑メール登録したいメールを選択します。
2

「迷惑メール登録」アイコンをタップします。
3
登録したい迷惑メール条件を選択し、「登録」をタップすると迷惑メール条件が登録されます。選択したメールは迷惑メールフォルダーに移動します。
登録した迷惑メール条件を
確認・解除する
1

メール一覧左上のアイコンをタップ。
2

「設定」をタップします。
3

「迷惑メール対策」の「迷惑メール条件」をタップ。
4

登録されている迷惑メール条件が一覧で確認できます。条件を解除したい場合は「解除」ボタンをタップします。
迷惑メールと判定されたメールを
アプリで受信する
1
メール一覧左上のアイコンをタップ。
2
「設定」をタップします。
3

「アカウント設定」のY!mobileメールアカウントの設定(@yahoo.ne.jp)をタップ。
4

「Y!mobileメール関連」の「迷惑メールの受信」をタップしてオン(の状態)にすると迷惑メールと判定されたメールを受信します。
迷惑メールフォルダーに受信した
メールを確認・解除する
1
メール一覧左上のアイコンをタップ。
2

「迷惑メール」をタップします。
3
受信した迷惑メールが一覧で確認できます。登録を解除したい場合は「(チェックボックス)」をタップしてメールを選択します。
4

「迷惑メール登録解除」アイコンをタップします。
確認画面で「解除」をタップすると、選択したメールが該当する迷惑メール条件を解除します。